Well I was doing this to make a signature for myself and I figure i might as well write up a tutorial and be SORTA useful around here. So here it goes!
This came about because I was quite mad to see you could not go underwater very deep in the "Beach" level in Diorama Studio, considering Waffedolpins around I find it kind of stupid. Anyway here we go. Pardon my writing skills I'm not exactly a pro at large walls of texts.
Things you need are:
Photoshop(Easy to find, I'll leave you to that.)
Diorama Studio(A durrrrrr)
About 15-30 minutes
So, in this tut you'll go from something like this:
To this!
PrimeGuys Make your own background tutorial
- PrimeGuy
- Class C Shinki
- Posts: 36
- Joined: Thu Mar 12, 2009 2:39 am
- Shinkis owned: 8
- MMS owned: 0
- Favorite MMS/Shinki: Strarf
PrimeGuys Make your own background tutorial
Last edited by PrimeGuy on Fri Mar 27, 2009 2:35 pm, edited 2 times in total.
- PrimeGuy
- Class C Shinki
- Posts: 36
- Joined: Thu Mar 12, 2009 2:39 am
- Shinkis owned: 8
- MMS owned: 0
- Favorite MMS/Shinki: Strarf
Re: PrimeGuys Make your own background tutorial
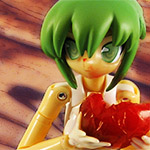
Well obviously the first step is to open up Diorama Studio. and start posing your model. I'm going to assume you know the pose you want and how to do it so i'll just skip to scene selection.
Now i use the "back" of the computer room level, that is pure white, MAYBE the little trophy stand area can be used too. I'm not sure. Do what you want. You should take a picture along the lines of this, Be sure to leave enough space for the watermarks to slap on and not interfere with your model, Like so!
Now obviously it should be said white colored shinkis don't work so well, I cant really fix that unless they updated with a greenscreen level.
Now the fun stuff, open up photoshop, I use CS3 but CS1/2 users should know the tool I'm using.
First use the crop tool to get rid of that watermark, Since we are just making the background transparent you can also cut out any dead space like so: Now first you want to copy the layer(Basically the photo) Find "Layers" and look for the only one that by default should be called "Background" and have a lock on it. Right click and select "Duplicate layer" and name it whatever you want or leave it alone.
Now create a new layer(make sure its transparent) and fill it with pure black. place it above the locked background and below the new copy. Delete the old background like so if you wish. At this point the layer box should look like this:
Now, with the copy of the photo(not the black layer) selected, to go Select>Color Range, use the dropper tool on the background(the white area!) and set the fuzziness until you get a basic pure black outline of the figure something like 40 for strarf here. There should be no white spots ANYWHERE inside the figure. see example: Now click OK and go to Select>Modify>Expand and type in 1 Pixel. it should look like this, more or less done but with some trouble spots left (almost always in the hair).
Just zoom in and use the magic wand to select them and delete them. This really is the most tedious part but its the part that makes the cutout atleast decent enough to use for sigs/banners and whatnot.
Now the only thing left is to either delete or hide the black background and save as a .png, the end result should be something like this:
Note: there ARE better ways to cut out stuff like this, but i've never really got the hang of em. Use this if you want but it is in no way the definitive way to do this.
Ok, now. Hard parts over! in the final post i'll show you how to use these pngs for custom images!
Last edited by PrimeGuy on Fri Mar 27, 2009 2:04 pm, edited 3 times in total.
- PrimeGuy
- Class C Shinki
- Posts: 36
- Joined: Thu Mar 12, 2009 2:39 am
- Shinkis owned: 8
- MMS owned: 0
- Favorite MMS/Shinki: Strarf
Re: PrimeGuys Make your own background tutorial
Well basically you find an image/wallpaper/whatever you want to use and open it in photoshop, and drag and drop the .png into it. after some cropping/resizing if need be the final image will look something like this:
And with that its over, I dont write many tutorials for anything really and photoshop has always been one of the hardests to explain for me. So I hope that helped someone!
- Xerain
- Class C Shinki
- Posts: 45
- Joined: Mon Aug 04, 2008 5:10 am
- Shinkis owned: 12
- MMS owned: 5
- Favorite MMS/Shinki: Maochao
- Contact:
Re: PrimeGuys Make your own background tutorial
That's a good guide. I've using the white screen effect to my advantage for a while, but it's good that it covers some selection making tips for people who don't know them. One thing I will add, though, is that editing out the logo is completely unnecessary if it does not exist in the first place.
I find that my video card rends DS and BR much better than the "default" appearence. However when using the built in capture things still come out all jaggy like in your pics. So instead use just about any external screen capture app to grab the pics. in my case, I use Irfan View. You can hide all the interface boxes by pushing different F keys. Turn them all off and snap away. It's a much better picture quality, and no logos.
- Chaos Incarnate
- Graphics Guru
- Posts: 242
- Joined: Mon Apr 28, 2008 5:52 pm
- Shinkis owned: 12
- MMS owned: 0
- Favorite MMS/Shinki: Strarf
- Contact:
Re: PrimeGuys Make your own background tutorial
Aww, and here I was expecting a tutorial for making the water image itself...